How to Create an Online Store?
A Step-By-Step Guide for Beginners
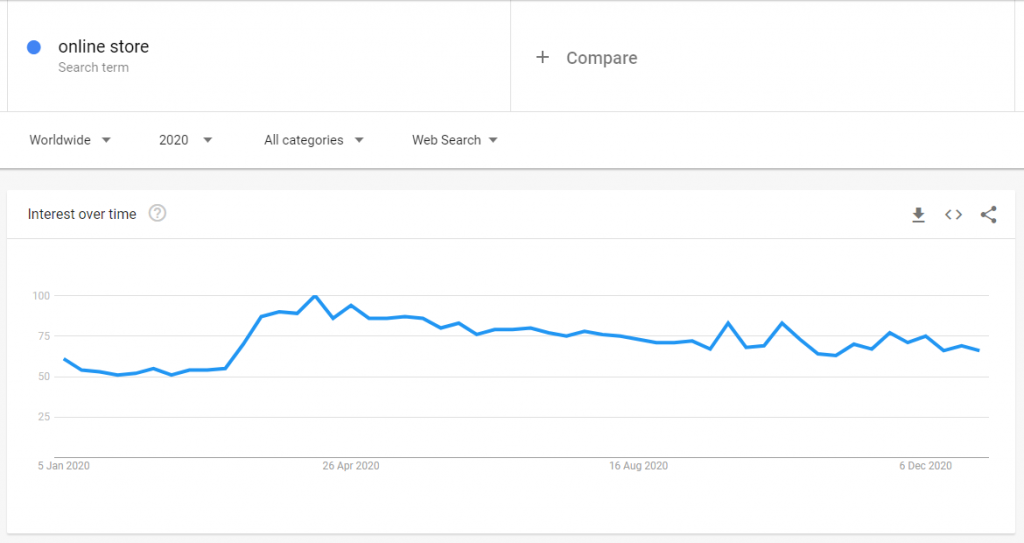
2020 is likely to go down as the year when businesses went online, a massive shift as the COVID-19 pandemic has brought the world to a halt. Whether you are a mega-business, medium-size company, or even a small local store, almost non could escape from this “new normal”.
Source: Google Trends—”online store”
But as more and more businesses start to take their spot in the online space, they are also fueling the already rising competition. And that’s the power of marketing pages. It is the advertising branch of your business, to knock on people’s curiosity, attract them, and convert visitors into customers. (Click here to read more about marketing pages)
In this guide, I will be talking about creating an online store using one of the available tools. Also, some tips to leverage your online store functions to boost your sales.
CONSIDERATIONS WHEN CHOOSING AN ONLINE STORE PLATFORM
Before jumping straight into creating an online store, it would be useful to spend some time thinking about the following items. These factors could potentially affect which online building platforms you might end up choosing.
-
Fees
A lot of the currently available online store builders (eCommerce website builders) are often subscription-based. Shopify, for example, charges users starting at $29 USD per month plus additional transaction fees for certain payment methods. While some platforms might not be charging users for using their service, there might still be other charges such as commissions or transaction fees.
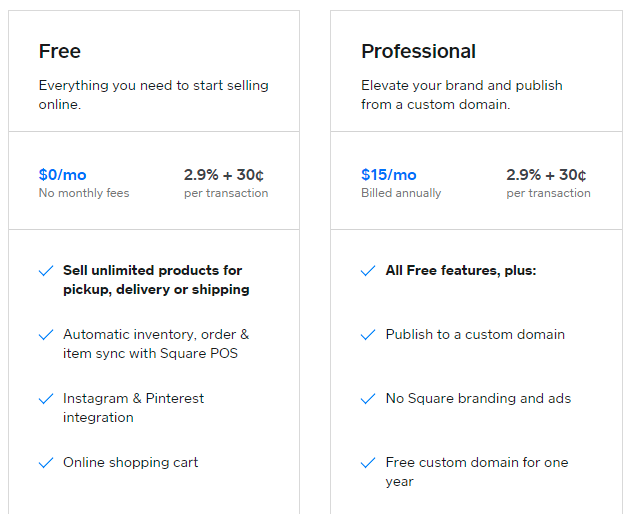
Square does not charge users for using their free plan but charges 2.9% plus 30 cents per transaction
Another population: WooCommerce. It is an eCommerce solution powered by WordPress, meaning you will need to purchase a web hosting plan in order to build a WordPress website and operate WooCommerce. Not only that, but you might also need to pay to unlock premium features and install additional plugins in order to utilize WooCommerce. And if you don’t have much experience or knowledge on how to build and operate a WordPress website, WooCommerce might not be an ideal option for someone who is new to creating online stores.
-
Payment integration
Depending on your target market, you might also want to take a look at the available payment gateways options of each system. Do they offer services that cover credit card customers, debit card customers, cash customers, mobile (non-bank) payments, etc?
-
Mobile-friendly online store
People are spending near three hours on their smartphones every day. And with the focus on developments such as 5G networks and faster mobile devices, the smartphone screen time is most likely to continue to increase.
In fact, online services have been shifting to mobile, particularly when 55% of purchases were made on mobile devices, as compared to 36% on desktop devices. Some expect the mobile commerce market (m-commerce) to grow at a compound annual growth rate of 34% from 2021 to 2026. As a reference, the global mobile commerce report was valued at $628 billion in 2020.
What do all these statistics mean for your business? Not only do you need to move online, but you also need to move online and go mobile!
-
Time needed to build the online store
Will different online store builder options, think about your ability to launch and maintain an online store. Are you managing it by yourself? Do you have any technical expertise or access to people who know how to operate these platforms? Are you expecting to use a tool that allows you to quickly jump-start your online eCommerce business? Choose one that suits your level and needs.
Considering all different factors—not much technical expertise; able to seek help when needed; and the ability to quickly build and start the eCommerce site—I would recommend Website.com for the following reasons:
-
No extra transaction fee
Before we begin, let’s clarify two terms:
- Payment Processing Fee—charged by the payment gateway provider (e.g. PayPal, Stripe, Square) that processes credit card payments
- Transaction Fee—charged by the platform where you build your online store
Whether you are a Website.com free plan or paid plan user, Website.com offers PayPal as the payment gateway option for all plans. Other than that, they also offer Stripe and Square for their paid plan users. Similar to all other online stores, PayPal charges a standard payment processing fee for credit card processing per online transaction when you use their service. Website.com, on the other hand, will not be charging users an extra transaction fee per purchase. This might be the case for some platforms such as Shopify, which charges users an extra transaction fee unless users use Shopify’s own payment gateway method.
-
Secured payment method
Paypal is one of the most popular payment gateway methods with over 400 million active users worldwide by mid-2021. It is one of the most secured payment services with a low fraud rate at 0.32% of revenue, providing a set of protocols for both consumers and merchants.
By mid-2021, there are over, making it one of the most popular online payment gateways in the world. PayPal provides a range of safety protocols for both sellers and buyers, it is one of the most secure payment platforms with a remarkably low fraud rate at 0.32% of revenue. If anyone is worried about any potential financial fraud, providing the PayPal payment option could, maybe, ease their concerns.
-
Try out the online store features for free
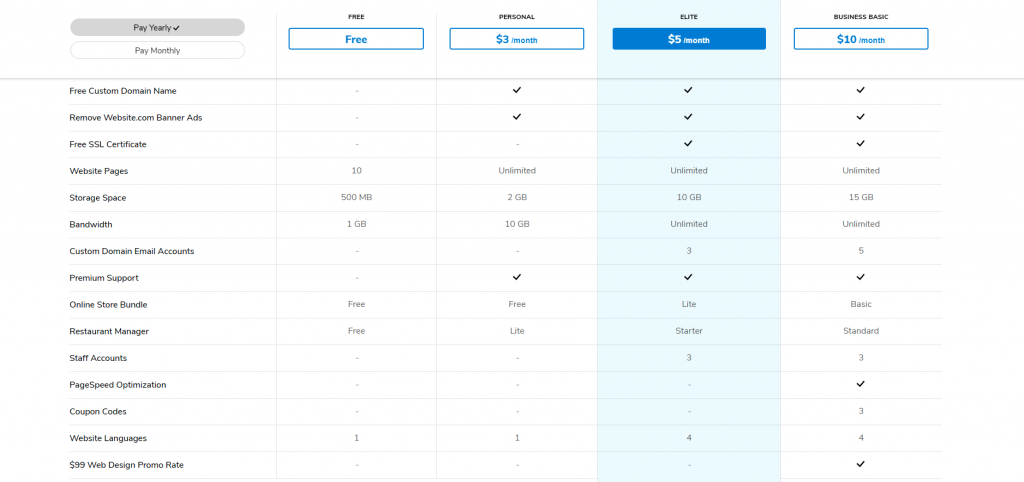
Website.com offers all users, even those who had enrolled in the free plan, to try out their online store features including online and offline payment options, product options, option choices, etc. And as user’s online store grows, they can opt to upgrade the plan to unlock more eCommerce features.
Website.com price plan: general
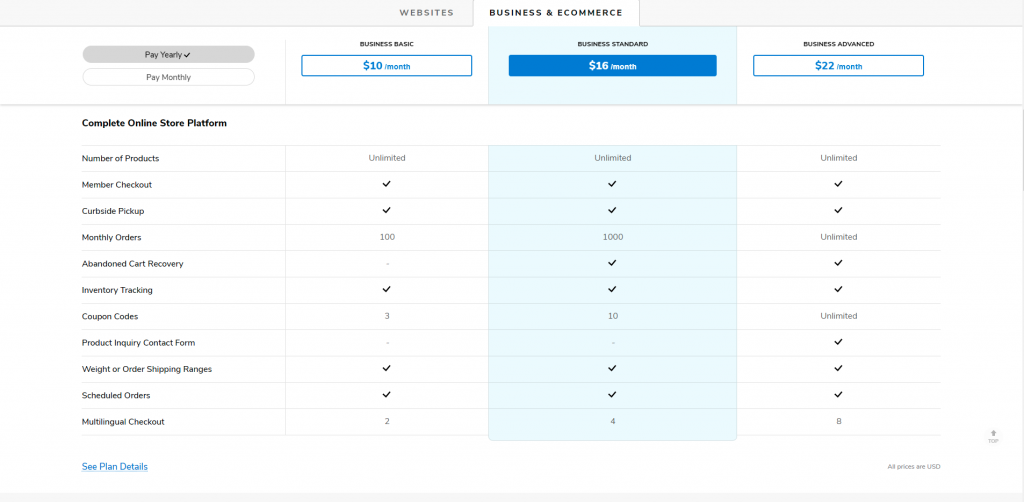
Website.com price plan: general
-
Ready to use eCommerce templates
There are over 500 website templates, each designed and crafted by website designers from Website.com. There are also templates specifically targeting online stores, all users need to do is to replace elements (text and image placeholders), add products, and provide product details. Users can then launch and start doing business online.
HOW TO CREATE AN ONLINE STORE?
Choose an eCommerce template
While you can certainly choose to build a website from scratch, based on my personal experience, using a template gave me a better idea of what a “good online store website” should look like. And from there on, I can start customizing to fit my brand.
The first step to take is to get to Website.com’s eCommerce website template page and select a template that suits you.
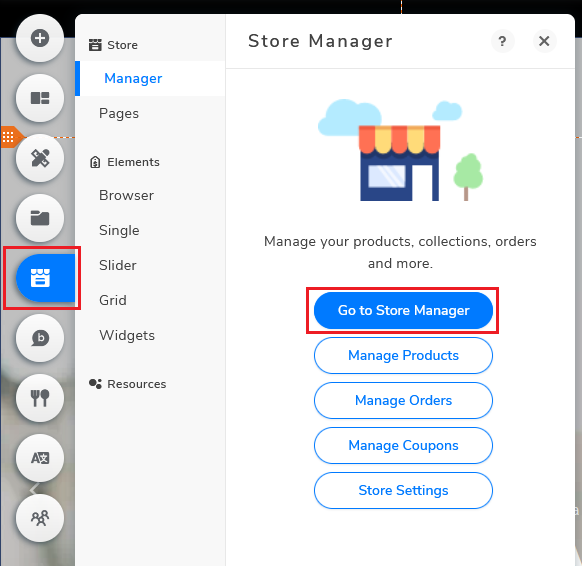
Next, once the platform finishes loading and you can now see your chosen template on the website builder, click on the Store icon button and select Go to Store Manager to start managing your online store.
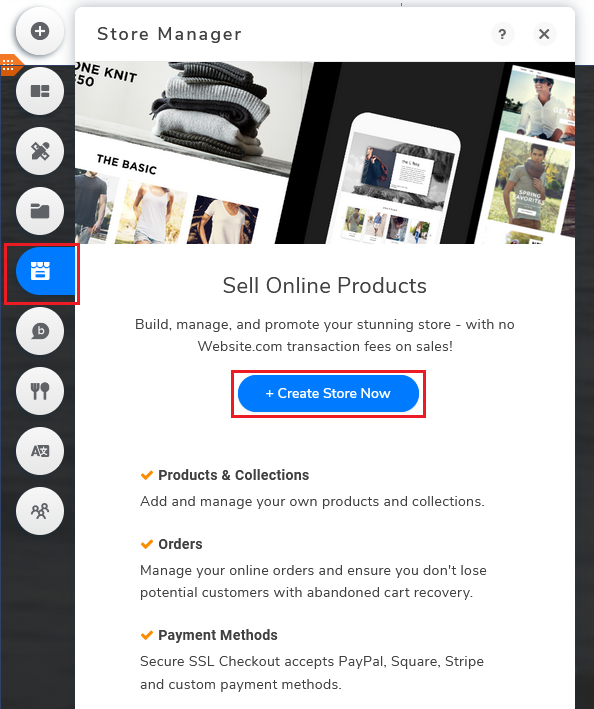
If by chance you’ve selected a non-eCommerce template, or you’ve first built a website and now you want to add an online store, go back to the store icon button and click +Create Store Now. A brand new eCommerce web page will appear, all you need to do is to follow the steps mentioned above to get to the Store Manager interface.
Add and manage products
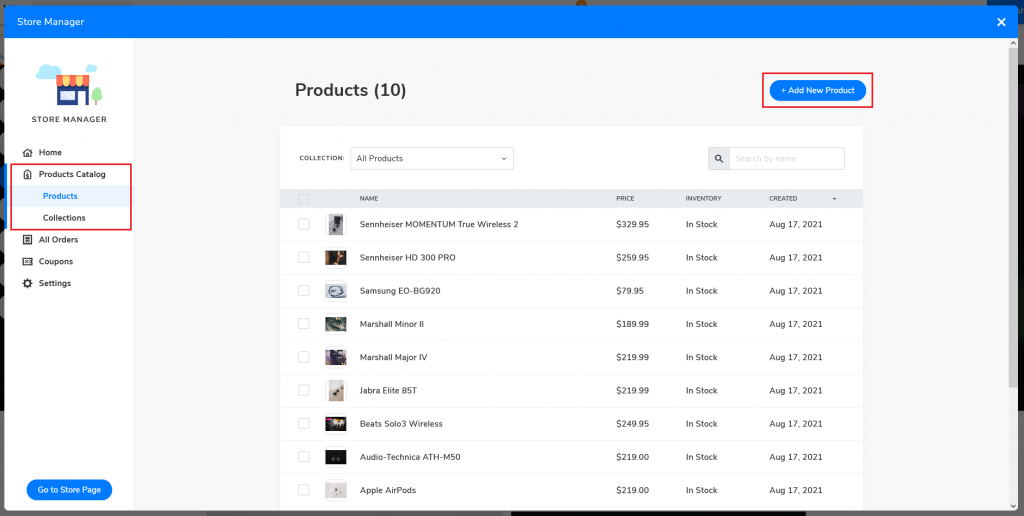
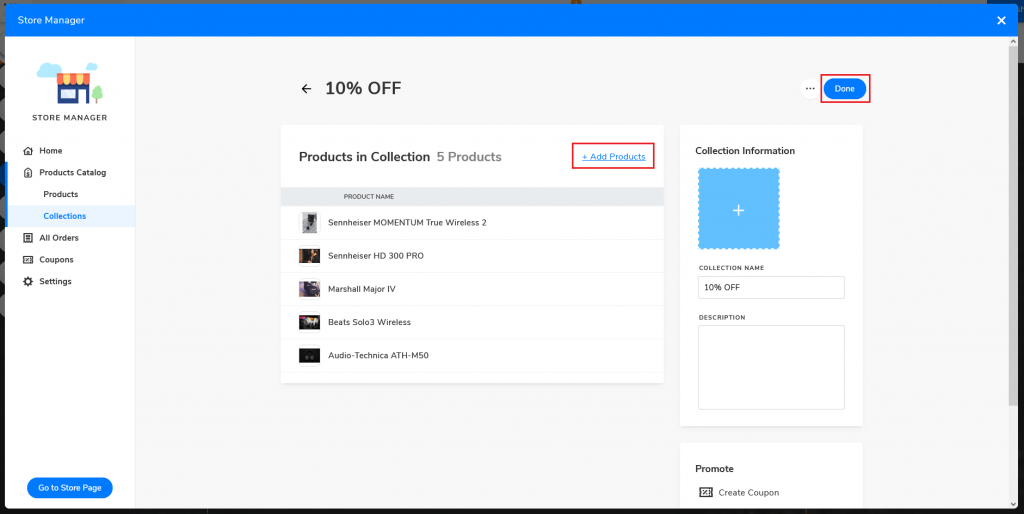
You can add and edit product details under Products Catalog.
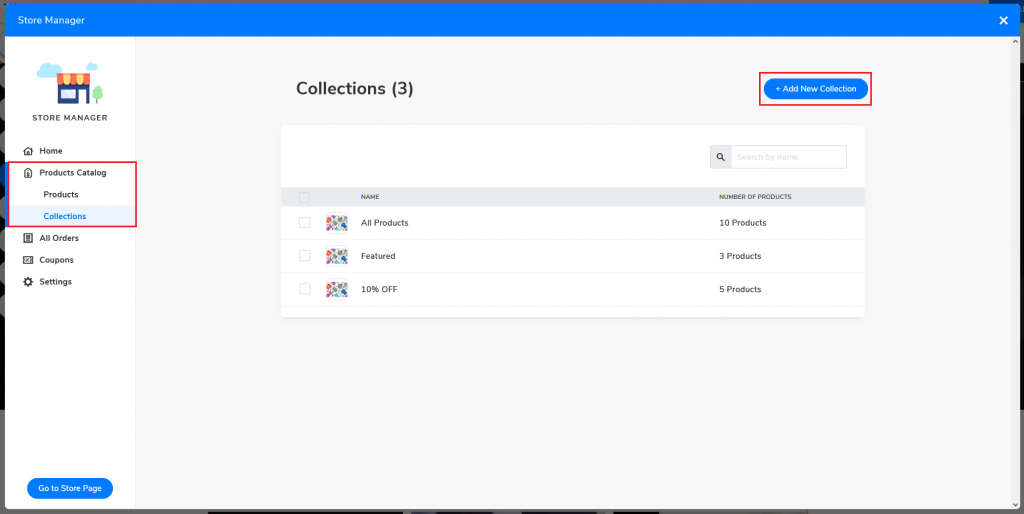
Say you want to group certain products, maybe you want to apply the same discount on multiple products. You can simply first group the products together as collections under the “Collections” tab and apply the discount to specific Collections.
Click +Add Products to add products and input product details to your collection. You will also find the same button under the Collections tab.
When you’re ready, remember to press Done.
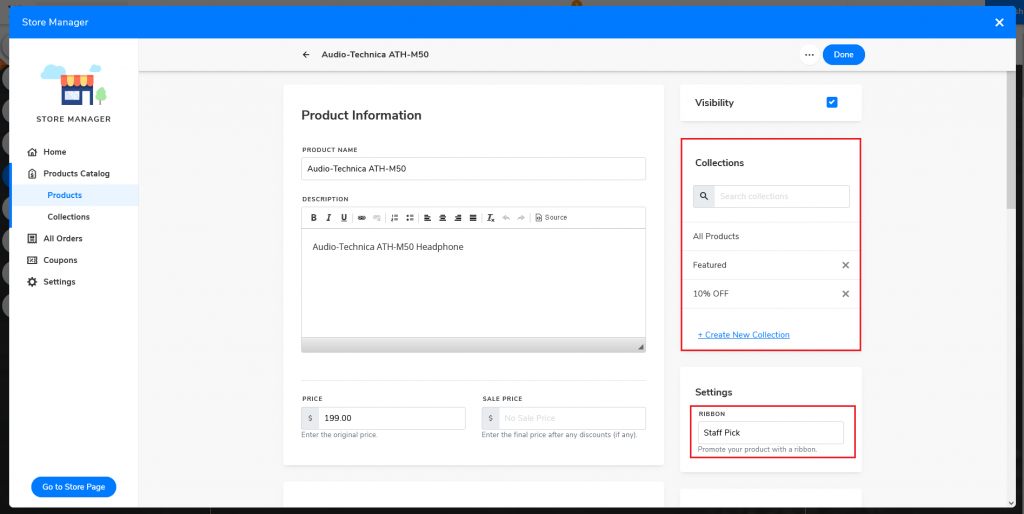
You can also add products to an existing collection or create a new collection when editing details of a specific product.
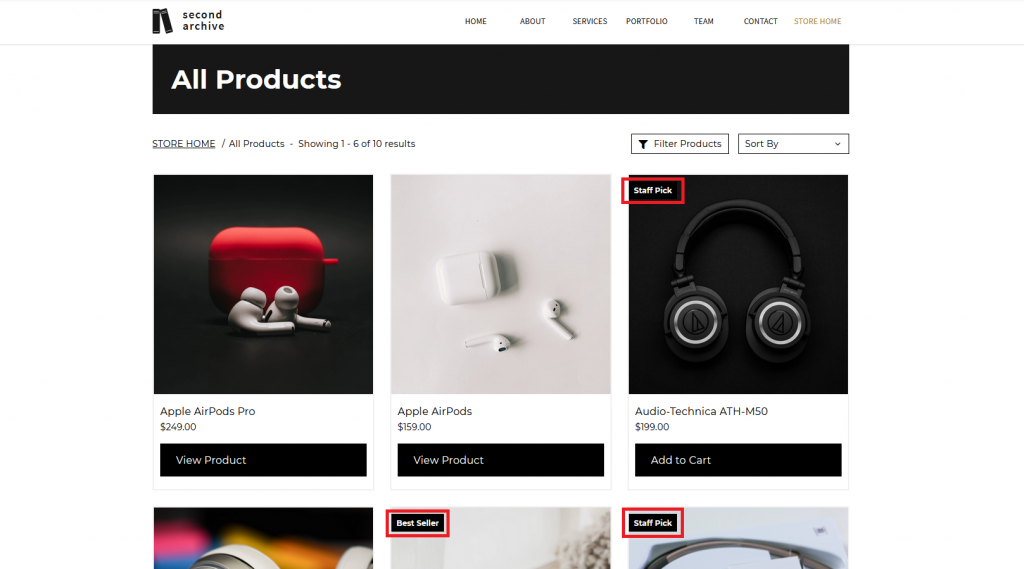
Product Ribbons are small tags shown at the corner of each product, usually used as additional promotion of certain products.
CAN COUPONS HELP YOUR BUSINESS?
In marketing, coupons are a promotional tool, usually in the form of a document or electronic ticket used to redeem for a discount when purchasing goods or services. It is a great way to boost your sales and help to further promote your business. In fact, almost 90% of U.S. customers said to have used coupons when purchasing online. U.S. customers even spent as much as a total of 13 million hours a week just to search for online coupon codes. (I mean, who doesn’t love getting discounts!)
Some other advantages include:
- Attract new customers
- Increase awareness of your products
- Increase chances for repeated sales
- Enhance customer loyalty
- Promote a new product line
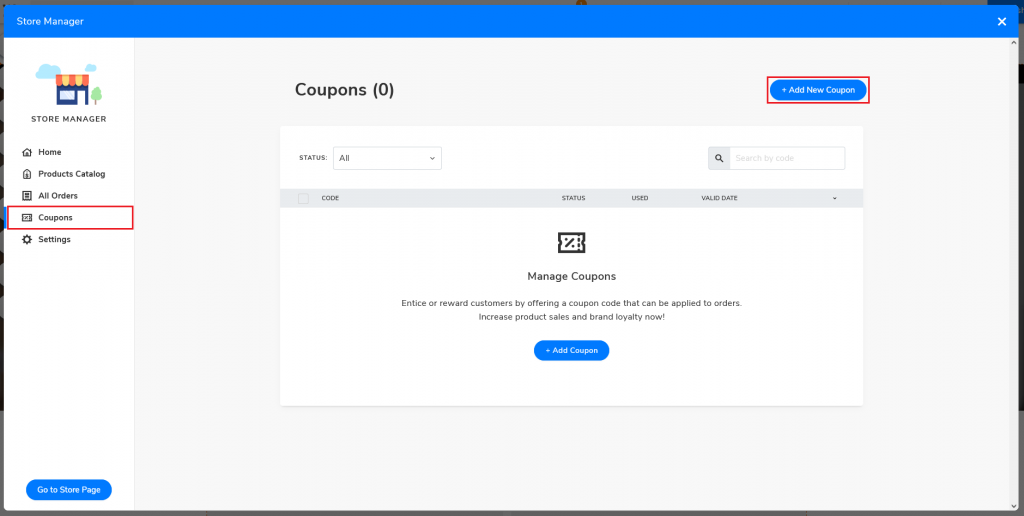
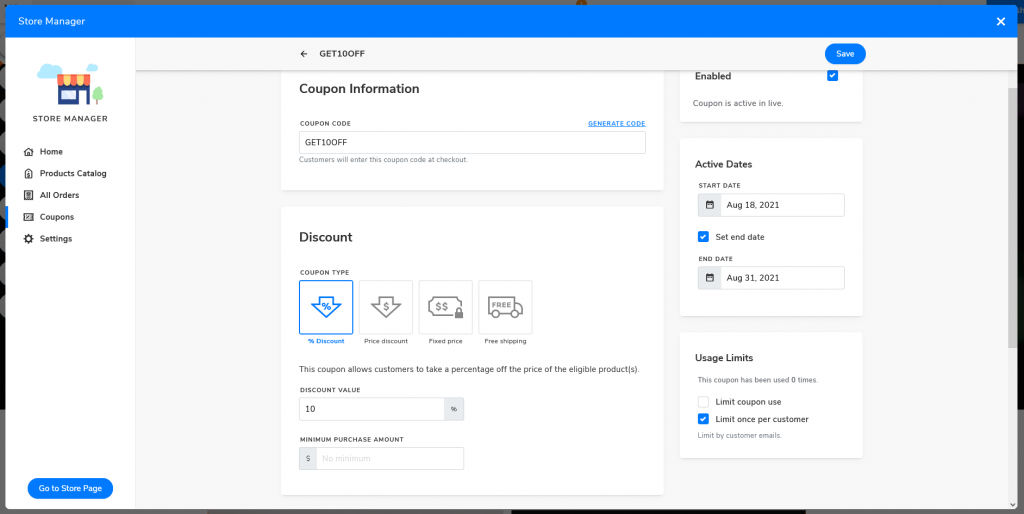
To activate the coupon function, go to the Coupon tab in the Store Manager and click +Add New Coupon.
This is where you can edit the details such as customizing your coupon code, type, discount value, etc.
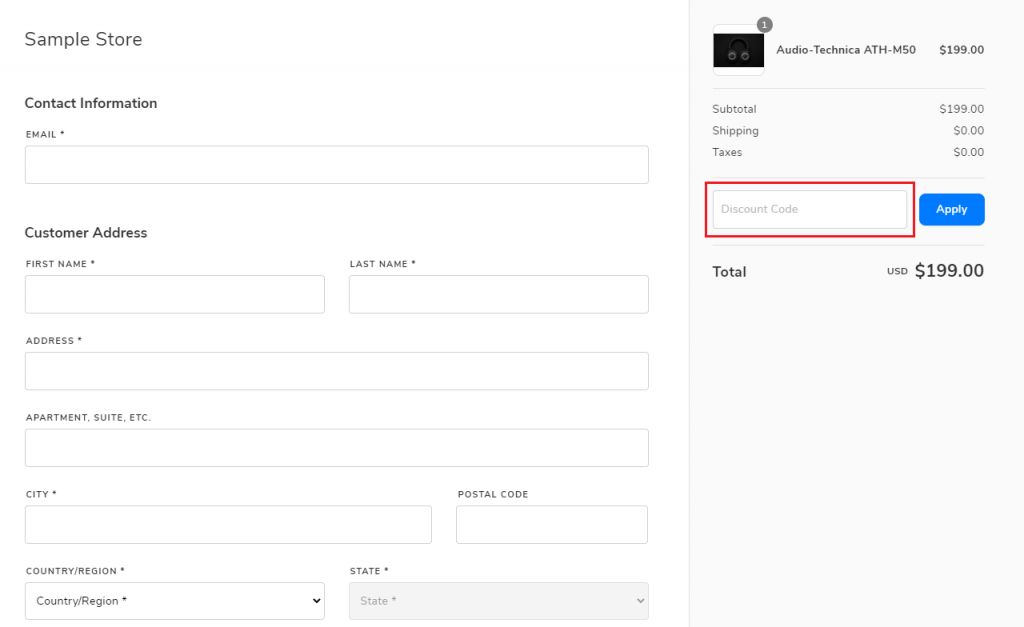
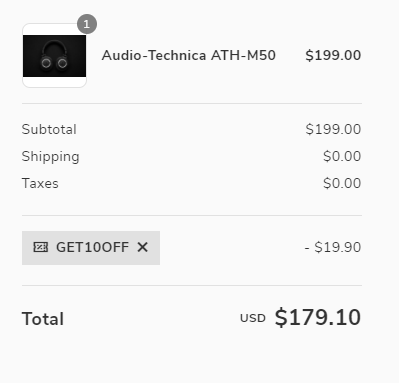
Once activated, your customers will be able to use the coupons when buying from your online store by entering the coupon code in the “Discount Code” area.
Promoting Your Coupons
Now that you’ve set up a coupon code, it will be useless if no one can see it. There are numerous methods, for instance:
- Social media posts (you will need to have social media accounts)
- Email marketing (you need to set up an email subscription)
- Coupon platforms (these are external websites/mobile applications)
- Marketing page
Another simple one, which required near to no effort, is to have your coupon code shown directly on your eCommerce web page. For stance, right above your online store.
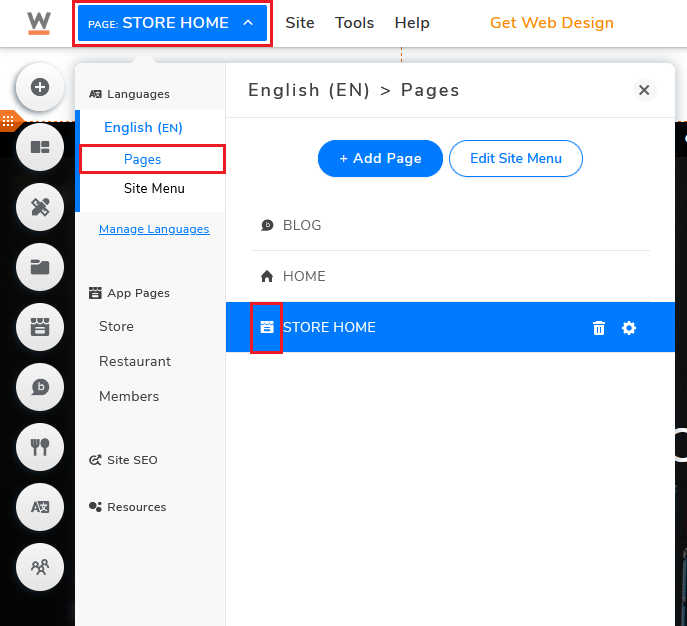
(If you’re not on the online store web page) Click the PAGE button and select the page with the Store Icon.
Select the text element (at the very top) and click Edit Text.
You are free to type whatever suits you, but the general rule of thumb is to never only provide your coupon code and nothing else. Provide details—What is the discount about? Under what condition can you use the coupon? Coupon Code?
Example:
And whenever you’ve set a new coupon, always remember to change your code promotion, particularly the coupon code (“GET10OFF”).
Click here to know more about Website.com’s website builder platform, how to add and edit elements to customize your eCommerce website.
WHAT ARE ABANDONED CARTS AND WHY IT IS IMPORTANT?
Business Standard and Business Advance plans only
What are abandoned carts? It appears when potential customers leave the checkout page before completing the entire process. According to Baymard Institute, the average shopping cart abandonment rate was near 70% globally. Forrester Research even predicts that companies could lose up to USD $18 billion annually due to abandoned carts.
This is definitely bad for all businesses. But there’s a way to try and retrieve these potential lost sales—abandoned cart emails.
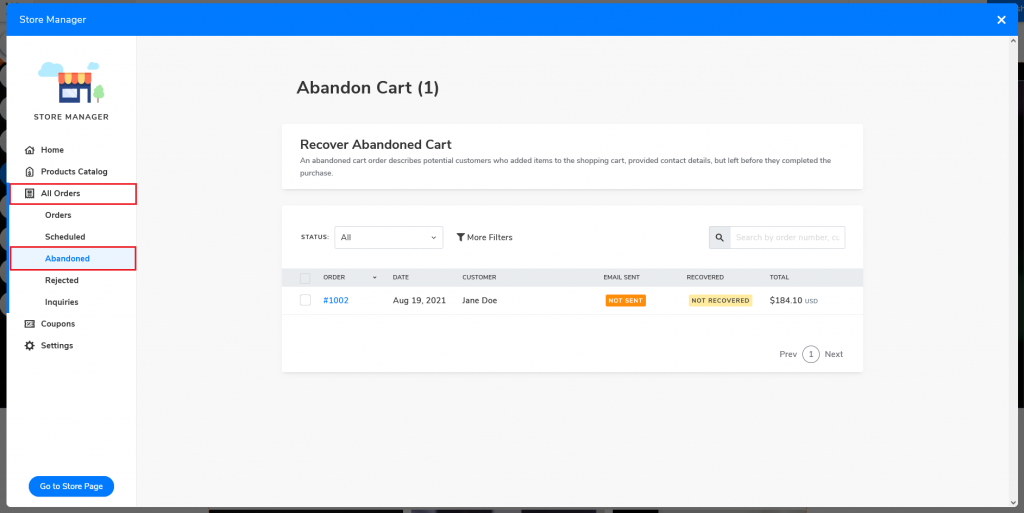
Through Website.com’s online store manager, business owners will be able to track down all these abandoned orders. Open Store Manager, All Orders, and click on the Abandoned tab.
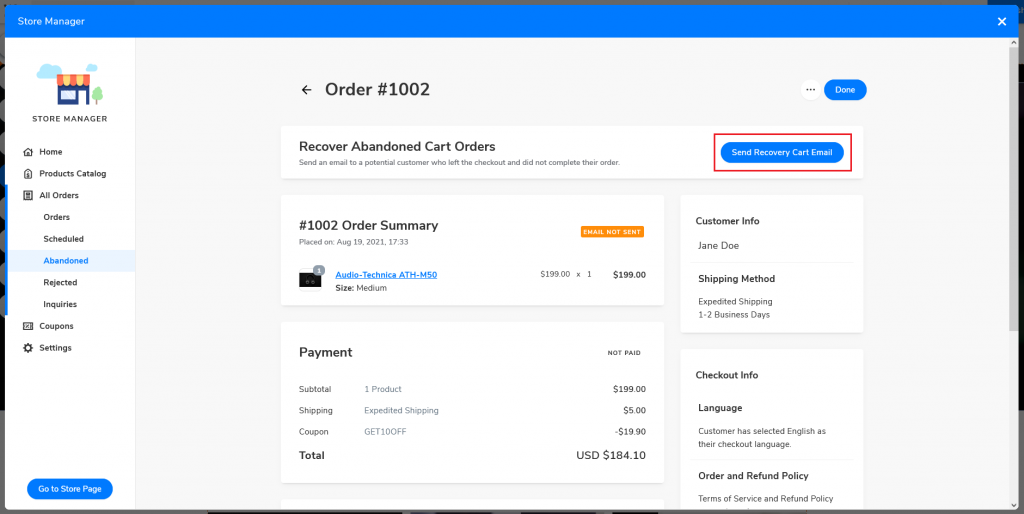
All the incomplete orders will be listed here. Select the orders and click Send Recovery Cart Email to re-engage with potential customers.
Once the email is sent, the system will automatically update the email delivery status.
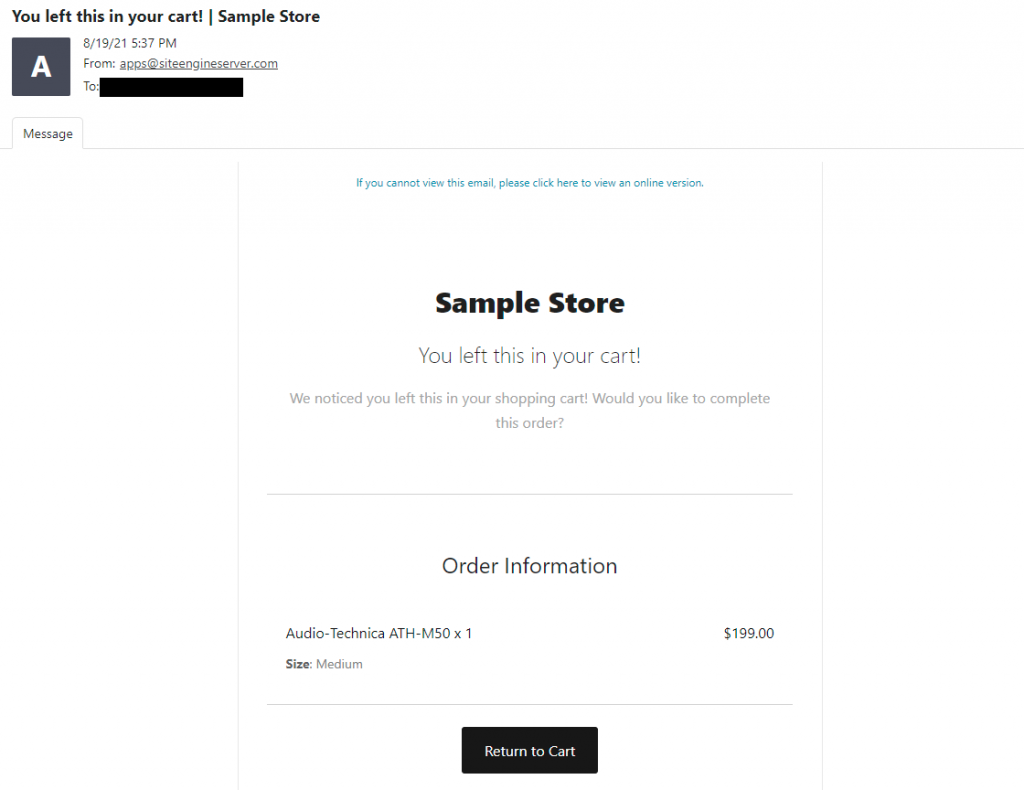
Sample of the recovery email:
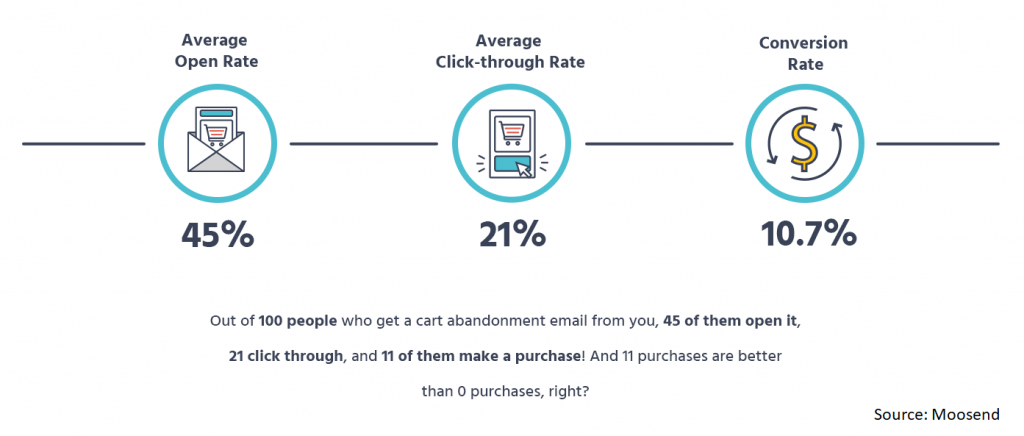
Not all customers actually thought about abandoning their orders, some might just have clicked the wrong button and closed the tab/browser by accident! Moosend did a study and found out that of all the abandoned cart emails that they have sent out, 45% of them were read, 21% managed to get people back to the checkout page, and 10.7% had successfully been retrieved.
Therefore it is always good to look out for any abandoned carts since there’s always a chance that you could successfully retrieve them. You just never know!

